This tutorial describes how to write instrumentation tests for your Android application. It covers the usage of Espresso to write UI tests and how to run these tests via Android studio.
Why testing?
Writing and maintaining a good test suite containing different types of tests requires a good amount of time and discipline on the part of the developer. However, the benefits that comes with doing this includes the following:
- Helps to ensure the correctness of the app features.
- Helps to implement new features with confidence that the new changes will not break existing working code.
- Facilitates building of app features in modules and iterations especially when tests are first written [TDD], then codes are written to validate the test.
Categories of Android unit tests
-
Local unit tests: These are tests that runs on the JVM. They do not require any native Android library to run. They are found in
app/src/test/javafolder in the Project perspective. Unit test should amount to about 60-70% of the test code base. -
Integration test: Tests more than one individual module working together that implements a complete functional part of an app. Integration test are located in the
app/src/androidTest/javafolder and requires the Android system to run. Should amount to about 20% of the test code base.
Espresso is a testing framework contained in the Android Testing Support Library. It provides APIs to simulate user interactions and write functional UI tests.
Espresso tests are written based on what user might do while interacting with your app. Basically, you:
- Locate the desired UI element
- Interact with the UI element or check its state.
Android Instrumentation tests are located in the app/src/androidTest/java folder
and this is the location where you will be writing your tests.
Espresso tests are composed of three major components which are:
-
ViewMatchers: These are collection of objects used to find the desired view in the current view hierarchy. They are passed to the
onViewmethod to locate and return the desired UI element. -
ViewActions: They are used to perform actions such
clickon views. They are passed to theViewInteraction.perform()method. -
ViewAssertions: They are used to assert the state of the currently selected view. They can be passed to the
ViewInteraction.check()method.
For Example:
onView(withId(R.id.my_view))            // withId(R.id.my_view) - ViewMatcher
    .perform(click())                  // click() - ViewAction
    .check(matches(isDisplayed()));   //matches(isDisplayed()) - ViewAssertion
Setting up Espresso in your project
- Download the latest Android Support Repository via the SDK Manager or Android Studio
- Open your app’s build.gradle file, the one located in
app/build.gradleand add the following lines inside dependencies:
// Android JUnit Runner
androidTestCompile 'com.android.support.test:runner:0.5'
// JUnit4 Rules
androidTestCompile 'com.android.support.test:rules:0.5'
// Espresso core
androidTestCompile 'com.android.support.test.espresso:espresso-core:2.2.2'- To that same
build.gradlefile, underandroid.defaultConfig, add the following:
testInstrumentationRunner "android.support.test.runner.AndroidJUnitRunner"Sample build.gradle file
apply plugin: 'com.android.application'

android {
    compileSdkVersion 23
    buildToolsVersion "23.0.3"

    defaultConfig {
        applicationId "com.android.sample.espressouitestsample"
        minSdkVersion 15
        targetSdkVersion 23
        versionCode 1
        versionName "1.0"

        testInstrumentationRunner "android.support.test.runner.AndroidJUnitRunner"
    }
}

dependencies {
    // App's dependencies, including test
    compile 'com.android.support:support-annotations:22.2.0'

    androidTestCompile 'com.android.support.test:runner:0.5'
    androidTestCompile 'com.android.support.test:rules:0.5'

    //Espresso core
    androidTestCompile 'com.android.support.test.espresso:espresso-core:2.2.2'
}
Set up your device for Espresso tests
To ensure that espresso works as expected on your test device or emulator, turn off animations on your device. Navigate to Settings -> Developer Options and turn all the following off under Drawing
- Window animation scale
- Transition animation scale
- Animator duration scale
A sample app showing a SignUp and Login screen will be used to demonstrate the
basic concepts of Espresso. To follow through with the snippets in the following
section, please clone this git repository.
git clone git@github.com:mayojava/espressoUIIntegrationTest.git
Now let’s dive in
The sample code has a main screen with a Login and SignUp button. The first test we
will be looking at, is to check that the SignUp screen shows up when the SignUp button
is clicked. In the androidTest folder, open the app/src/androidTest/java/.../mainscreen/MainScreenTest.java file. The first
thing to notice here are the annotations:
-
@RunWith(AndroidJUnit4.class): Tags the class as an Android JUnit4 class. Espresso unit test should be written as a JUnit 4 test class. -
@LargeTest: Qualifies a test to run in >2s execution time, makes use of all platform resources, including external communications. Other test qualifiers are@SmallTestand@MediumTest. -
@Rule:ActivityTestRuleandServiceTestRuleare JUnit rules part of the Android Testing Support Library and they provide more flexibility and reduce the boilerplate code required in tests. These rules provides functional testing of a single activity or service respectively. -
@Test: Each functionality to be tested must be annotated with this. The activity under test will be launched before each of the test annotated with@Test.
To test that the Signup screen shows up when the Signup button is clicked, we do the following:
- Locate the Signup button using the
withIdViewMatcher. - Perform a
click()action on the button. - Assert that the Signup screen is displayed.
The code for the steps above is shown in the snippets below:
    @Test
    public void clickSignUpButton_opensSignUpScreen() {
        //locate and click on the login button
        onView(withId(R.id.button_sign_up)).perform(click());

        //check if the sign up screen is displayed by asserting that the first name edittext is displayed
        onView(withId(R.id.edit_text_first_name)).check(matches(allOf(isDescendantOfA(withId(R.id.layout_sign_up)), isDisplayed())));
    }
Next open the SignUpScreenTest.java file under app/src/androidTest/java/.../signup/SignUpScreenTest.java. Here we want to test that
on filling the signup form and clicking the Signup button, the Success screen is displayed with the signup success text, when the signup is complete.
The code for the test above, follow the following steps:
- Locate each of the sign up form text fields using the
withIdViewMatcher. - Perform
typeText()action on each, to type in the text for that field. - Locate sign up button and perform the
click()action on the button to submit the form. - On sign up completion, assert that the sign up success screen is displayed with the success text.
The code for the steps above is shown below:
@Test
public void clickSignUpButtonAfterFillingForm_showProgressAndSuccessScreen() {
    String first_name = "Firstname";
    String last_name = "lastname";
    String emailAddress = "firstname.lastname@g.com";
    String password = "password";

    //find the firstname edit text and type in the first name
    onView(withId(R.id.edit_text_first_name)).perform(typeText(first_name), closeSoftKeyboard());

    //find the lastname edit text and type in the last name
    onView(withId(R.id.edit_text_last_name)).perform(typeText(last_name), closeSoftKeyboard());

    //find the email address edit text and type in the email address
    onView(withId(R.id.edit_text_email)).perform(typeText(emailAddress), closeSoftKeyboard());

    //find the password edit text and type in the password
    onView(withId(R.id.edit_text_password)).perform(typeText(password), closeSoftKeyboard());

    //click the signup button
    onView(withId(R.id.button_sign_up)).perform(click());

    //check that we can see the success screen with success message
    String successString = InstrumentationRegistry.getTargetContext().getString(R.string.text_sign_up_successful);
    onView(withId(R.id.text_view_status_message)).check(matches(allOf(withText(successString), isDisplayed())));
}
For a list of possible ViewMatchers, ViewActions and ViewAssertions check out the
Espresso Cheat Sheet
Running Espresso tests
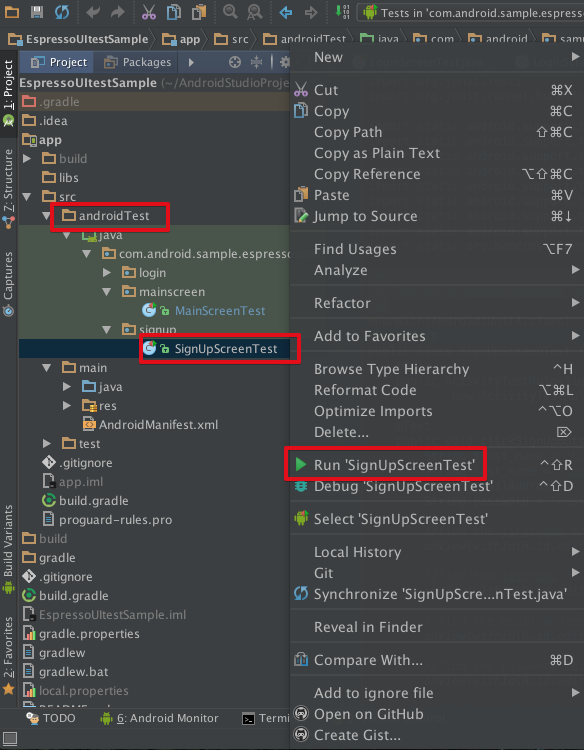
To run a single test class, right click on the test class file and select the ‘Run [TestFileName]’ option.
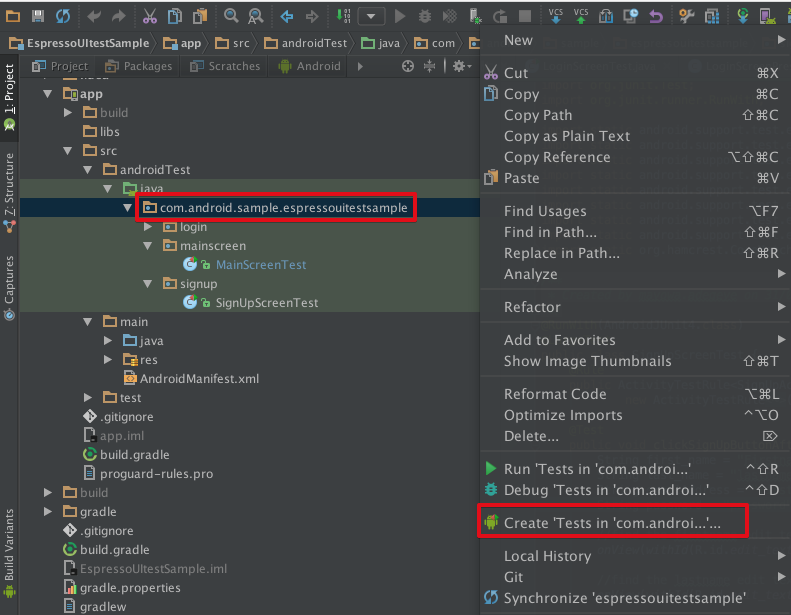
To run many different tests at the same time, you will need to create a build configuration. This can be done easily in Android Studio by right clicking on the
package name under androidTest /java/.. and select “Create Tests in [package name]”
option.
Select the new run configuration from the run configuration menu and select run. Tests results are displayed in the run panel at the bottom of the screen.

References and further readings:
- Espresso Documentation
- Espresso Intents
- Android Testing Support Library
- Android Testing Codelab
- ViewMatchers
- Hamcrest Matchers
The sample code for this post can be found in this github repo.